But back to my inspiration. I saw this today and it reminded me of a foil technique that i wanted to try. I knew it wouldn't take a ton of time so as soon as i got done working i went to work.
This cute "LOVE" decor comes from http://alicew.typepad.com. Here is my own very cheap version.
All you need is cardboard, mod podge, foil (heavy duty) and paint
I started by cutting my cardboard.
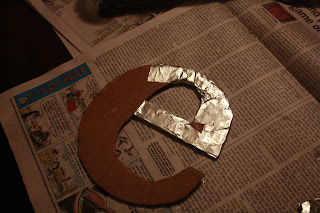
Then mod podge the foil on. Start by tracing your letter onto the foil. But before you mod podge that on. Cover the edge of the letters with foil.
Then mod podge the piece of foil that you traced.
Once dry clean off any mod podge from the front of the letters. Then apply a coat of paint. This is what they will look like. (i used a dark grey, but can use black - can use acrylic craft paint)
Before it completely dries, take a rag a gently wipe some of the paint off.
I am linking up with:
http://savvysouthernstyle.blogspot.com/2012/01/wow-us-wednesdays-51.html
http://savvysouthernstyle.blogspot.com/2012/01/wow-us-wednesdays-51.html


Love the letters...thanks for the tutorial...no pun intended! LOL
ReplyDeleteI Love these so much! I have been looking for wooden letters to decorate. I never thought to make them out of cardboard - thanks for the idea!!!
ReplyDeleteThis came out really nice! I've got to take some time to start some pinterest projects of my own!! Thanks for the inspiration.
ReplyDeleteHave you seen the way they get the distressed wood look with vaseline? I wonder if I painted the letters black, let it dry, rub some vaseline on them, and then spray gold (rub off before all the way dry) if it would work too.....
ReplyDeleteHi Abbi, I am wanting to know did this work as i would like to try the wood look also. Thanks
DeleteWisdom tooth is really hurt specially when its blooming inside our mouth,well thank for the info about it,i remember some dental issue in Helsinki Finland and i am glad that in using tooth paste its removed. remove wisdom teeth
ReplyDeleteHi,
ReplyDeleteDid you tear small pieces of foil and podge them one by one? OR did ya just cover the letter completely?
Did you use a stencil for the letters? Love that font...where do I get it? Thanks. Very cute! Monika
ReplyDeleteThat turned out very nice! I think I will try it for the letters in my craft room. Thanks for the inspiration! :) Carmen
ReplyDeleteY'know? I saw these pictured somewhere on a Pinterest site--but when I googled the words:" distressed metal letters are actually made of cardboard, aluminum foil & paint! " --( & images) all I got were the pins.. and I looked and looked... .until now! ......I wanted the " how to do this! " not just the images from the pins!! LOL.......I am a Christian..and when I saw the name of your blog ...I just had to chuckle..'cause that is exactly what I am.. a grace filled mess...too--- Until the day the Lord transforms... Thank you so much for your " tutorial" on these... I will use the technique for a display tri-fold panel for a Christmas scene~ blessings, ...and, there ARE folk who CARE to see what you posted here... it was God sent!
ReplyDelete